Spicy Watermelon Martini

DSC_0614.JPG

I have enjoyed spending my summer in Greenville and getting to try out new cocktail lounges and speakeasies where I can sip on some truly unique drinks. I have not, however, enjoyed spending $12 on a single drink. Making an artisan cocktail in your own home is easier than you think, and it’s always a great way to impress guests.

This summer, Eric and one of his good friends have kind of bro-ed out over watermelon. When they get a craving for it, they go buy one and proceed to eat the entire thing standing over the kitchen sink. This has already happened about 3 times this summer. As classy as this is, I wanted to buy a watermelon and find a more creative way to consume it.

DSC_0633.JPG

That’s literally the face I  get every time he is eating a watermelon. It’s as if he’s holding it like we should all be jealous (though I will say with this drink in his hand, you should be a little jealous because it’s THAT good 😉 )

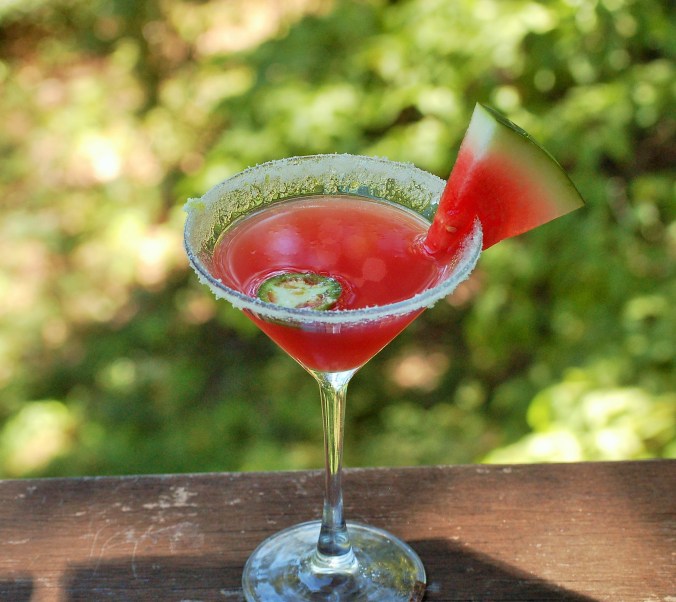
I knew I wanted watermelon and lime, but I also wanted it to have a kick. I used to hate jalapenos in cocktails, but the more I have tried them out the more I love them. It’s like a secret layer of flavor that gives you a hint of spiciness when you are least expecting it. The watermelon is so naturally sweet that it needs a punch of something to contrast all that sweetness. And there is not only lime juice in the drink,  but lime sugar around the rim. Basically, it tastes like candy with every sip as you work your way around the glass.

DSC_0615.JPG

I also have never been a huge fan of watermelon. But eventually when your boyfriend is constantly obsessed with buying watermelons you figure you have to just eat (or drink) some. And I was not at all disappointed by this drink! If you are not big on watermelons, I urge you to try it anyway. It was fantastic! Fair warning though: it’s a little dangerous because it’s so refreshing. I almost forgot there was any alcohol in there.

DSC_0629

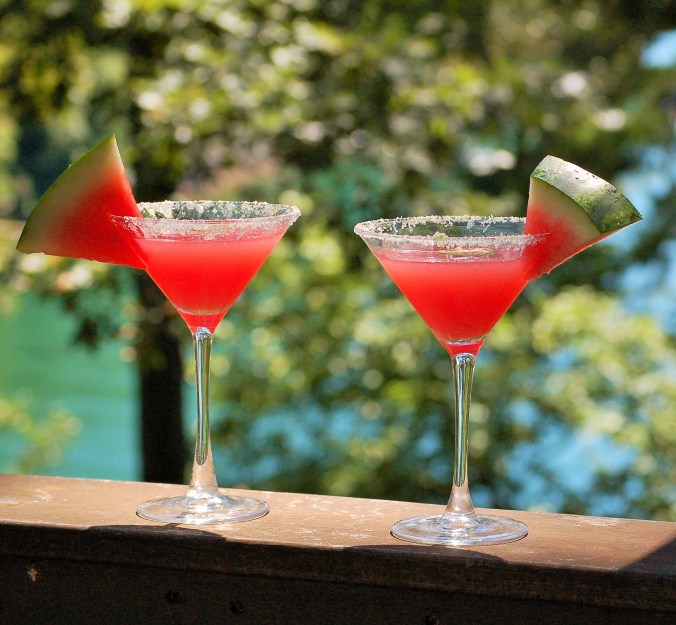
Spicy Watermelon Martinis

Serves 8

Ingredients:

1/4 of a large watermelon, diced

1 jalapeno, sliced

3 limes

1/2 cup sugar

Your favorite brand of gin (I used Bombay Sapphire)– roughly 1.5 shots per mixed drink

Directions:

  1. Using a potato peeler, peel the zest off of one of the limes. Place the lime zest and sugar in a food processor and mix until the zest is broken up and incorporated into the sugar. If you don’t have a food processor, just finely zest the lime juice and mix it into the sugar. Place on a small plate and set aside.
  2. Using the same food processor or a blender, combine the watermelon, jalapeno, and juice from all 3 limes. You might have to do this in 2 batches depending on how large your food processor is.
  3. Pour the watermelon mixture into a fine mesh sieve to strain out the excess pulp. Discard pulp and reserve juice.
  4. To make each individual drink, rub a small piece of watermelon around the rim of the martini glass. Dip in the lime sugar mixture. Combine 1/2 cup of watermelon mixture, 1-1.5 shots gin, and ice in a cocktail shaker. Shake and serve in the prepared martini glass. Garnish with a small slice of watermelon.


Creamy Pasta with Egg– AKA the Easiest Pasta You’ll Ever Make

DSC_0609

I am known to dabble in the kitchen as my creative outlet. It generally relieves my stress and gives me something to do other than grad school. Sometimes, however, this results in Eric walking in on me swearing like a sailor and attending to 4 different pots on the stove because I just had to make something with 30 ingredients on a school night. But Eric, I just wanted to try homemade Naan tonight… as I realize it’s already 8:00 and I have several exams to study for.

Sometimes, I manage my time a little better and realize that I have a busy evening ahead of me, and it’s best to make something as easy as possible that is still satisfying. That’s where this pasta comes in. My mom used to make us this pasta every time my Dad was out of town and we needed an easy dinner that takes no time at all to whip up and uses ingredients that we always have on hand. She grew up eating this pasta when her Mom was in the same predicament. It’s so simple it’s barely a recipe! But, simple pasta is all the rage these days (Cacio e pepe, anyone?).

DSC_0605.JPG

This pasta is so creamy, so buttery, and yet so simple. I’ve been known to make this for breakfast, lunch, dinner, and my personal favorite: midnight snack. It takes only 10 minutes from start to finish, and the end result is a creamy bowl of pasta that you keep refilling for seconds.

It’s not exactly something you serve up for a dinner party, but it’s one of the foods that keeps you going through the hustle and bustle of everyday life. As much as I love spending hours in the kitchen on fancy meals, there is no shame in simple comfort food. There have been many times when Eric has walked in the apartment and smelled the starchy, buttery smell of this pasta and instantly grinned because he couldn’t wait to dig in. Once you start making it, you’ll see. People around you always want a bite.

DSC_0601

Creamy Pasta with Egg

Serves 2 

Ingredients:

1/2 lb cavatappi, penne, or macaroni noodles

4 Tablespoons salted butter

1 large egg

Salt and pepper, to taste

Directions:

  1. In a medium pot seasoned generously with salt, cook the pasta until al dente.
  2. Drain the noodles, reserving 1-2 Tablespoons of the pasta water. Immediately throw the noodles back into the pot and put it back on the stove over very low heat.
  3. Add the butter and egg, and stir for 1-2 minutes just until the egg is barely cooked.
  4. Season with additional salt (if needed) and a generous amount of freshly cracked black pepper.

Veggie Burgers with Gouda Cheese & Calabrian Chile Mayo

DSC_0582.JPG

Full disclosure: This recipe is purely a combination of things I had in  my fridge and  pantry. My parents were making burgers last weekend and of course I wanted to explore a vegetarian option. I ventured into the kitchen while Eric was playing cards with some of our friends. Being the sweetheart he is, Eric has taken the role of my recipe scribe now. I proceed to shout ingredients from the kitchen to wherever he is in the house and he keeps track of everything I’m using and the proper measurements so I can focus on the food without having to stop and write it all down.

It started out simple:

Eric, write down one can of chickpeas and one can of cannelini beans. 

Ok, now a green bell pepper. Sauteed with 1/4 cup onion and 2 cloves of garlic.

5 sage leaves. Cumin. chile flakes. Seasoned breadcrumbs.

Now we’re getting interesting! I have to admit that some of the inspiration for this burger came from this recipe, which I had made dozens of times before. But I wanted a good burger sauce, and I wanted something fairly simple to throw together. So I raided the fridge and viola! My original veggie burger is born.

I love using white beans for the burger because I have grown tired of black bean burgers. The combination of chickpeas and cannelini beans is somewhat unexpected, and it happens to go very well with the spicy calabrian chile mayo sauce. The Gouda cheese was originally not what I wanted on the burger, but it was all we had. However, I was pleasantly surprised! This burger has some unique ingredients, and they really do work well together.  Now, this is not a patty that is super firm and imitates the texture of real meat. It’s a fairly soft patty, but I crisp it up in olive oil to get a nice crust on it. With all the toppings and the amazing burger sauce, it really makes a great summer vegetarian meal. I love veggie burgers because they feel like you’re eating junk food, but they are really so healthy and they are loaded with great fiber and nutrients!

While everyone else that night was eating regular hamburgers for dinner, they were all commenting that my veggie burgers smelled amazing– and they were. Everyone tried some and was pleased with the crispy, aromatic patties. On a perfectly toasted brioche bun with a spicy mayo, they just can’t be beat!

DSC_0569

Veggie Burgers with Gouda Cheese & Calabrian Chile Mayo

Makes 6 patties

Ingredients:

For the veggie burgers– 

1 (15 oz) can cannelini beans, drained and rinsed

1 (15 oz) can chickpeas, drained and rinsed

1 green bell pepper, finely diced

1/3 cup finely diced onion

2 cloves garlic, minced

1/2 Tablespoon olive oil

1/2 teaspoon chile flakes

1/2 teaspoon cumin

5 leaves fresh sage, chopped

1 Tablespoon flour

1/3 cup seasoned bread crumbs

2/3 cup oatmeal

1 egg

Brioche buns, slices of Gouda cheese, shredded lettuce, thin slices of onion, & garden tomatoes, for serving

For the Calabrian chile mayo– 

1/2 cup good quality mayonnaise

1 Tablespoon Calabrian chiles (packed in oil)

1 clove garlic, minced

1 Tablespoon grated onion

1/2 teaspoon ketchup

1 Tablespoon sweet relish

1/4 teaspoon celery salt

Directions:

  1. In a medium skillet, saute the bell pepper, onion, and garlic with the olive oil. Season with salt and pepper. Cook for 3-5 minutes, or until the veggies are softened and fragrant. Set aside and allow to cool slightly.
  2. Place the drained beans in a large bowl. Using a masher or large fork, break down the beans until they are mostly smooth. Some texture is okay, but you don’t want huge pieces of bean throughout the mixture. Add in the cooked veggie mixture, cumin, sage, and chile flakes. Season with additional salt and pepper. Stir to combine.
  3. Add in the flour, oatmeal, bread crumbs, and egg. Stir to combine.
  4. Using your hands, form 6 patties from the bean mixture. Set on a plate and freeze for 30 minutes.
  5. To make the spicy mayo, combine the mayonnaise, calabrian chiles, garlic, onion, ketchup, relish, and celery salt in a small bowl. Set aside.
  6. Fry the patties in batches in a medium skillet with 1 Tablespoon of olive oil. Fry for 3-5 minutes per side, until a golden brown crust forms on both sides. Place thin slices of Gouda cheese over each patty while they are still hot.
  7. Place the calabrian chile mayo on both sides of each brioche bun. Lay thin slices of onion on the bottom bun, and top with the veggie patty. Top each patty with fresh tomatoes and shredded lettuce.
  8. Enjoy!


Crunchy Chickpea Tostadas with Spicy Peach Salsa

DSC_0537.JPG

Crunchy. Salty. Sweet. Spicy. Tangy. Creamy. VEGAN. What!? Today, I’m sharing a killer tostada that showcases my favorite local produce that I can’t seem to get enough of– peaches!

I used to hear the word “vegan” and think Ick. However, all my vegetarian and vegan cooking adventures have totally changed my world. This is one of those dishes that just happens to be vegan, but you really don’t even notice it.

I love tostadas because it feels like you are eating a giant nacho. You can buy them pre-made in the store, but it’s so easy to fry up your own tortillas and it’s totally worth it because you end up with the perfect texture. The only problem here is that they are small and you’re going to want more. Just go ahead and double the recipe below, you’ll thank me later 😉

DSC_0545

Anyone who cooks a lot of vegetarian and vegan meals knows that chickpeas are essentially gold. They are so versatile and can be a protein source in virtually any recipe. I love to crisp them up in olive oil and flavor them in different ways to use in various dishes. This time, I kept it simple and seasoned them with cumin and garlic.

These crunchy little nuggets of gold are nestled on top of an ultra crispy tostada, topped with creamy slices of avocado, and finished with a spicy-sweet peach salsa. It is the perfect light lunch! Not to mention super easy to throw together. It looks fancy, but you can have it ready in 20 minutes.

DSC_0556

Crunchy Chickpea Tostadas with Spicy Peach Salsa

Serves 4

Ingredients:

1 (15 oz) can chickpeas, rinsed and drained

2 Tablespoons olive oil

1/2 teaspoon cumin

1 clove garlic, minced

1 avocado, sliced

4 small corn tortillas

1/2 cup vegetable oil

For the peach salsa–

3 peaches, peeled and diced

1/4 cup finely diced red onion

1/3 cup finely chopped cilantro

1 Serrano pepper, minced (if you don’t want the salsa to be quite as spicy, make sure to remove the seeds first.)

juice of 1/2 of a lime

Salt and pepper, to taste

Directions:

  1. Make the peach salsa: Combine the peaches, red onion, cilantro, Serrano pepper, and lime juice in a medium bowl. Season to taste with salt and freshly cracked black pepper. Set aside.
  2. In a small/medium skillet, heat the vegetable oil over medium-high heat. When the oil is hot, fry each tortilla individually, about 1-2 minutes per side until golden brown. Place on a paper-towel lined plate and season immediately with salt. Set aside.
  3. In a separate medium skillet, heat the olive oil over medium-high heat. Add the chickpeas, garlic, and cumin to the skillet. Stir occasionally, and cook until the chickpeas are nice and crispy (about 5 minutes). Season with salt and pepper.
  4. To build the tostadas, place several tablespoons of chickpeas on top of each tostada. Place avocado slices on top of the chickpeas, and top with a healthy amount of peach salsa.


Beer-Battered Shishito Peppers with Southwestern Dipping Sauce

Use dip.JPG

As far as day-to-day cooking goes, I eat fairly healthy. But the name of this blog is not healthy. It’s Genuss, or pleasure/enjoyment. For me, food is all about balance. Sometimes, it’s been a crappy day at work and all I need when I come home is a comforting bowl of pasta. Sometimes, I finish a good workout and all I want is a clean bowl of salad. Sometimes, it’s Saturday at 4 PM and I really want bar food.

I am a firm believer that basically all deep fried items need a dipping sauce. The only thing that makes a fried food better is a creamy sauce to cool it down. Last weekend, a friend of my Mom’s gave us a bag of shishito peppers from her garden. Naturally, my first thought was to dunk them in a beer batter and fry them up (Hey, you gotta live sometimes 😉 )!

use above

Shishito peppers are like a fun little gamble because most of the time, they are sweet and not spicy at all. However, about one in ten shishitos has a spicy kick, and you can’t tell from looking at them which one it will be. Think of this dipping sauce as your insurance in case you bite into a hot pepper. If you like things really spicy, you could certainly do this recipe with jalapenos or other hot peppers of your choice!

use close

I used to be so intimidated by frying food in my own house. Turns out, all you need is a good cast iron skillet! I let the oil get “nervous,” test it with a small drip of batter, and fry the peppers in small batches to avoid cooling down the oil. As soon as they come out of the pan, I place them on a paper towel-lined cookie sheet and salt them immediately. The salt sticks to the hot oil and perfectly seasons the peppers so each bite is properly seasoned.

These fried peppers are absolute snacking perfection. The batter is super light so you get an incredible crunch with each bite. As soon as the peppers hit the hot oil, you get that aroma of capsaicin that starts to make your mouth water. The creamy sauce contrasts the crunchy texture of the fried peppers. Wash it all down with a good beer, and you’ll feel like you’re at a swanky gastropub.

use.JPG

Beer-Battered Shishito Peppers with Southwestern Dipping Sauce

Serves 4 

Ingredients:

20 Shishito peppers

1 1/2 cups all-purpose flour

1 teaspoon cumin

1 bottle of amber beer (I used Yuengling)

1 1/2 teaspoon baking powder

1/4 teaspoon sea salt, plus more for sprinkling over the peppers

2 cups vegetable oil

For the southwestern dipping sauce– 

1/2 cup sour cream

1/4 cup creme fraiche

1 clove garlic, minced

1/4 cup finely chopped cilantro

1/2 teaspoon chili powder

juice of 1/2 of a lime

1/4 teaspoon salt

Directions:

  1. Make your dipping sauce: Combine the sour cream, creme fraiche, garlic, cilantro, chile powder, salt, and lime juice in a small bowl. Set aside.
  2. Combine the flour, baking powder, cumin, and 1/4 tsp salt in a medium bowl. Whisk in the beer and stir until mostly smooth. The batter can be a little lumpy.
  3. In a medium cast-iron skillet, heat the oil over high heat (if you have a thermometer, 350 degrees would be good– I just look to see when the oil begins to shimmer).
  4. Fry the peppers in small batches, 4-5 at a time: dip each pepper in the batter, shake off the excess, and drop into the hot oil. Be careful, as it may splatter! Turn the heat down slightly if they are splattering too much.
  5. Fry each pepper until golden brown on both sides, about 2-3 minutes per side.
  6. Place the finished peppers on a paper towel-lined cookie sheet and season immediately with sea salt.
  7. Serve the peppers immediately alongside the dipping sauce.


Stromberg Salad

DSC_0505.JPG

Today, I am sharing another recipe that goes all the way back to my childhood. For as long as I can remember, my Dad made this salad that we ate alongside our dinner every night. As I grew older, I was so thankful that my parents got me in the habit of eating fresh food and having a salad every night. Continuing the Stromberg tradition, I now taught Eric how to make this salad so we can eat it with the dinners that I make every night for the 2 of us.

People ALWAYS asked how my Dad made the dressing. There is something about it that tastes so different from regular balsamic vinagrettes that you find in restaurants. I distinctly remember all of my friends and any other dinner regulars that we had gushing over my Mom’s home cooked meals and my Dad’s salad. One summer evening, there was a man who was installing a drain in our backyard to help with flooding. In Stromberg fashion, my Mom fixed him a plate of pasta and my dad made him a bowl of salad so he could eat something while he worked. We were watching him through the window as he sat down to eat the salad. His face was lighting up with each bite as he devoured it. A short while later he had a look of disappointment as he realized he finished the bowl and there was no salad left. He looked down at it momentarily, tilted his head back, and proceeded to drink every drop of dressing left in that bowl. He grinned like a child who just finished a bowl of ice cream.

DSC_0511.JPG

While it made me laugh, his reaction to the salad is not that uncommon. To this day, we usually break out a few slices of crusty bread to sop up all the extra dressing. It’s just so good.

The big secret to the dressing? Tomatoes, onions, and cucumbers. I know you’re probably thinking okay, a lot of salads have those ingredients… What’s the big deal? But the juices from those ingredients are essentially part of the salad dressing. You start by chopping up tomatoes, cucumbers, fresh herbs (usually basil and/or dill, depending on what we have on hand) and onions. A fat pinch of coarse sea salt and several cranks of freshly cracked black pepper helps them sweat and release their juices. Then, you add your oil, vinegar, cream, and blue cheese (which is optional, but it adds great flavor). I will also take a moment to go over my usual spiel that you should be using the highest quality olive oil and balsamic vinegar you can find. It’s really important to use the good stuff for a salad like this!

I remember peeking over my Dad’s shoulder as a child, wanting to learn the art of making this salad.  He taught me to look at the color of the dressing as a gauge. He would take a spoon to the bowl and take a sip to confirm that it was just right. Measuring out ingredients for this recipe was particularly tricky, and in all honesty I’m not 100% sure the measurements are as good as the color test. If all else fails, look at the picture below and try and match your dressing to that color.

DSC_0490.JPG

The dressing cannot be made separately in a jar or small bowl. The key is allowing the tomatoes, cucumbers, and onions to become the dressing. You leave everything sitting at the bottom of the bowl, top it with lettuce, and toss everything together just before you are ready to eat.

DSC_0503

This salad is at its peak in the heat of summer, when we have our very own garden heirloom tomatoes, basil, and cucumbers. If you can get your hands on some heirloom tomatoes, they are perfect for this salad.

DSC_0432.JPG

DSC_0439.JPG

I mean, just look at how juicy and beautiful those garden tomatoes are! This is another one of those dishes where there are not many ingredients, so you want to use the highest quality of each ingredient that you can get.

This recipe is so simple, it’s barely a recipe. But trust me when I say that it’s an amazing salad.

DSC_0507

Stromberg Salad

Serves 4-6 

Ingredients:

2 large heirloom tomatoes, sliced in rounds and then quartered

1 cucumber, peeled and diced

1/2 medium yellow onion, diced

2 Tablespoons fresh herbs, such as basil and/or dill

2 fat pinches of coarse sea salt

10-12 cranks freshly cracked black pepper

1/8 cup high quality balsamic vinegar

1/4 cup high quality extra virgin olive oil

1/4 cup heavy cream

2-4 Tablespoons blue cheese, crumbled  (optional)

1-2 heads lettuce, depending on size (I used 1 1/2 heads of read oak lettuce), torn or roughly chopped

Directions:

  1. In a large bowl, combine the tomatoes, cucumbers, onion, salt, and pepper.
  2. Add in the balsamic vinegar, olive oil, herbs, blue cheese, and heavy cream. Toss to combine. Allow to sit for a few minutes so all of the flavors can meld together.
  3. Place torn lettuce on top of the mixture. Toss salad together and serve immediately.
  4. Sop up remaining dressing with crusty bread. If you happen to have Gouda cheese on hand, a slice of toasted bread with Gouda and this dressing is out of this world!

Blueberry Basil Lemonade

use1.JPG

Anyone who has spent a summer in South Carolina knows that the heat and humidity can be brutal. We had a particularly hot weekend last week as I helped move my parents into their new house, and I needed something refreshing to quench our thirst after moving dozens of boxes in the heat.

…Enter blueberry basil lemonade. I am in LOVE with this drink. Nothing screams summer more than a glass of cold lemonade. Add fresh, local blueberries and basil from the garden, and you’ve got a unique summer drink. Add some vodka, and you’ve got a killer cocktail!

Lemonade is one of those nostalgic drinks that instantly takes me back to childhood. Growing up, I lived on a small cul-de-sac off of a busy highway. 2 of my best friends lived next door and we so desperately wanted to be like the other kids who lived in suburban neighborhoods and had lemonade stands. One hot summer day, we made homemade lemonade and put a sign up by the highway advertising our summer treat. We waited at the end of the cul-de-sac for several hours and we FINALLY got one lone customer who saw our sign from the highway. We were so ecstatic that we proceeded to rave about our successful business for the rest of the day. I’d like to think if we upgraded our lemonade stand to include this beautiful drink, we would have been sold out!

use3.JPG

There is something about slicing lemons that makes me feel so calm and clean. Whether I’m zesting or juicing them, the aroma of fresh lemons just puts me in a great mood. This lemonade in particular is quite possibly the best I’ve ever had. The basil gives it an extra layer of freshness and the blueberries give it a gorgeous color and natural sweetness.

A few things to note about this recipe: I like my lemonade on the tart side. I wrote the recipe using only 1/2 cup of simple syrup, but if you know you like it sweeter you may want to adjust that. I also like my lemonade with a LOT of ice, so I don’t water it down as much. You can certainly add more water if you feel like it’s too concentrated.

use2.JPG

Blueberry Basil Lemonade

Serves 6-8

Ingredients:

8 large basil leaves

1/2 cup granulated sugar

1/2 cup water

1 1/2 cups freshly squeezed lemon juice

1 cup fresh blueberries

7 cups water

Directions:

  1. Make the basil simple syrup: In a small pot over medium heat, combine the sugar and 1/2 cup of water and stir until the sugar dissolves. Turn off the heat and add the basil leaves. Allow to steep for 10 minutes or so. Remove the leaves from the pot and set the simple syrup aside to cool slightly.
  2. Muddle the blackberries with a mortar and pestle and place in a large pitcher (If you don’t have a mortar and pestle, just smush them in a bowl to break them down and release their juices).
  3. Add the lemon juice, simple syrup, and 7 cups (or more, if desired) of water to the pitcher.
  4. Serve lemonade over ice and enjoy!

Lasagna-Style Eggplant Parmesan

DSC_0352.JPG

Most young children do not jump up and down when they hear that Eggplant is what’s for dinner. This child did, and it’s because my mom makes a killer eggplant Parmesan. Most restaurant versions of this dish only have mozzarella and (of course) Parmesan cheese. My Mom’s version, however, has a layer of herbed ricotta as well. Not to mention the glorious sauce.

Growing up, my Mom always asked us what we wanted our special birthday dinner to be. 9 times out of 10, this eggplant Parm was my choice. Of all the delicious things my Mom cooked growing up, this was almost always my meal of choice when I was given the option of anything I could possibly want. That should tell you how amazing this dish is.

FullSizeRender (35)

Just look at those crispy layers of heaven! This dish is so sinfully cheesy and rich that you don’t miss the meat for a second. The fried slices of eggplant are layered with all three cheeses and the heavenly marinara in little towers. Everyone gets their own leaning tower of cheesy, savory, melt-in-your-mouth eggplant—yes please!  If you need an impressive, hearty meal for a crowd, this dish is your go-to.

This would be an excellent time to pull homemade sauce from the freezer. It makes the whole dish so much easier if you already have your sauce done. All you have to do is fry up your eggplant, layer it with cheese and sauce, cook some pasta, and bam! Dinner is done.

DSC_0337.JPG

Lasagna-style Eggplant Parmesan

Serves 6-8

2 medium/large eggplants, peeled and sliced in 0.5 inch rounds

2 eggs beaten with 1 tablespoon of water

½ cup sunflower or vegetable oil (You may need more throughout the frying process)

2 cups flour

2 cups seasoned breadcrumbs

1 batch of Mom’s Spaghetti Sauce 

½ cup fresh Italian Parsley, chopped

15 oz. whole-milk Ricotta cheese

8 oz. fresh mozzarella, thinly sliced

½ cup freshly grated Parmesan cheese

1 lb pasta, for serving

Fresh basil, for serving

Directions:

  1. Lay the slices of eggplant on top of a few paper towels on a counter top or table. Sprinkle salt over each slice and let them “sweat” for about an hour. This will draw excess moisture out of the eggplant.
  2. Preheat the oven to 350 degrees.
  3. Prep your breading station: In three shallow dishes, line up the flour, beaten eggs, and breadcrumbs.
  4. Heat the sunflower oil in a large cast-iron skillet over medium-high heat. Dip each slice of eggplant first in flour, then in egg, then in the breadcrumbs. Fry the eggplant in the oil in batches, about 2-3 minutes per side or until golden brown. You may need to add more oil as you are frying if the skillet starts to look dry. Place the finished slices on a paper-towel lined cookie sheet.
  5. In a medium bowl, mix the ricotta cheese with the parsley and a good pinch of salt and freshly cracked black pepper.
  6. You will want a deep casserole dish to layer your eggplant. In the bottom of the casserole dish, spread out a ladle full of sauce to coat the bottom of the dish.
  7. Cover the layer of sauce with a layer of eggplant slices. Top the eggplant with dollops of ricotta, slices of mozzarella, and sprinkles of Parmesan. There is not an exact science here; there is just a LOT of cheese that you want to distribute over the eggplant!
  8. Top the eggplant slices with another layer of sauce. Repeat the layering process until you have stacks that are 3-4 eggplants high (can we make this an official new form of measurement?) and finish with a final layer of sauce.
  9. Cover the casserole dish with either a lid or aluminum foil. Bake in the preheated oven for 30 minutes. Remove the lid/foil and continue to bake for another 30 minutes uncovered.
  10. Serve the eggplant with the pasta of your choice and the remaining sauce. Top with fresh basil.

A Failed Blackberry Cobbler Turned Into a Blackberry Sundae [Because Nobody is Perfect]


DSC_0404.JPG

A few weeks ago on Father’s Day, I had a whole menu planned out for my Dad. When the late afternoon rolled around, I was busy chopping herbs for Chimichurri sauce, marinating steaks, whipping up a garlic aioli, making crispy potatoes, and attempting to create a blackberry cobbler-like dessert with beautiful berries from the market. Note that I was doing all of this simultaneously and, well… my dessert didn’t turn out quite like I wanted it to.

DSC_0410.JPG


My mouth started watering as I pulled the cobbler out of the oven and set it on the table to cool. It smelled amazing. After letting it sit for a few minutes, I grabbed my knife to cut into it. I began to wince as I felt the crust fall beneath my knife and the piece I attempted to cut totally fell apart. I sighed in disappointment as I realized that this was not going to be a cobbler at all, but a big pile of blackberry mush. My family was waiting in the living room as I took a spoon to the cobbler and took a taste for myself. When the blackberries and the vanilla wafer “crust” hit my mouth, all I could think about was how good it tasted. I didn’t care that it came in a sloppy form, it was just so tasty. I pulled out the sundae cups from the cabinet, scooped some vanilla ice cream, took the reserved blackberry sauce, and turned what would have been a failed dessert into a blackberry sundae. I apologized to everyone as I delivered the somewhat unattractive dessert cups.

DSC_0413

I didn’t hear any complaints. In fact, I didn’t hear much of anything aside from some Mmmmmmms, some spoons clinking the sides of the dessert glasses as they scooped out every little bite, and footsteps returning to the kitchen for seconds. If I were a more experienced food blogger, I probably would have tweaked the recipe until I got it just right and then shared that with all of you. I created this blog purely for fun, but I have to admit that it took me a while to start it because I was so intimidated by the seemingly perfect food blogs out there. I am so far from perfect, and this is not the first time a recipe didn’t go the way I had planned. However, nobody is perfect.

I’m sharing this recipe even though the crust doesn’t hold up at all. I’m sharing it because it was so delicious and it made everyone happy in the moments while they were eating it. I’m sharing it because I grinned like a kid when I opened up the fridge the next day and noticed there was one little bite left that I could take to work. And that, my friends, is what makes a good dessert.

DSC_0415.JPG

Blackberry Cobbler Sundaes

Serves 6

Ingredients:

25 Nilla Wafer Cookies

1/3 cup walnuts

6 Tablespoons butter (melted) & 5 Tablespoons butter (softened)

1 quart fresh blackberries

1 1/2 Tablespoons cornstarch mixed with 1/2 cup water

2 Tablespoons honey

1/2 cup brown sugar

1/4 cup oatmeal

1/4 cup flour

Vanilla ice cream, for serving

Directions:


  1. Preheat the oven to 350 degrees.
  2. In a food processor, combine the Nilla wafers and walnuts until finely chopped. With the motor of the processor running, add the melted 6 Tablespoons of butter.
  3. Press the mixture into an 11 by 7 inch baking dish. Set aside.
  4. In a medium sauce pan, combine the blackberries, water and cornstarch mixture, and honey. Heat over medium high heat until the blackberries cook down and the mixture reduces, about 10 minutes.
  5. Using a fine mesh strainer, strain the blackberries from the cooking liquid. Allow to cool slightly. Reserve the liquid and set aside.
  6. Pour the strained blackberries over the crust.
  7. To make the oatmeal topping, combine the softened 5 TB butter, oatmeal, brown sugar, and flour in a small bowl. Using your hands, crumble the mixture over the blackberries.
  8. Bake in the preheated oven for 15 minutes. Then, broil for 1-2 minutes.
  9. Allow the cobbler to cool slightly and then serve over vanilla ice cream. Use the reserved blackberry sauce to serve over the sundaes.